skip to main |
skip to sidebar
Världen har fått en ny stjärna, vi säger välkommen till Henry! Välkomstpresenten kompletterades med ett enkelt kort.
The world has received a new star and we welcome baby Henry! His welcome gift was accompanied by this simple card.
Ser ni hur det glittrar? Reprints fina papper fick extra skjuts med BoBunnys glimmer spray. Stjärnan är stämplad och embossad med guld.
Can you see the sparkle? The beautiful paper from Reprint got even prettier with glimmer spray from BoBunny. The star was stamped and embossed in gold.
Love,
Ulrika
Vitt, vintrigt och lager på lager. Så kan man sammanfatta detta grattiskort med spillbitar av den nya papperskollektionen från Reprint. Basen är vitt på vitt, härligt krämig gesso genom en stencil, på vanlig vit cardstock.
White as snow and built in layers. That's what this card is all about. I used scraps from the new paper collection from Reprint, on top of a white-on-white background, made with gesso through a stencil on regular cardstock.
Jag använde en vattenpensel att fånga upp lite distress färg och när jag duttade ut den på bakgrunden när gesson torkat skapades härligt rosa pölar.
I used a water brush to sweep up som distress paint which made beautiful pink puddles on top of the dried gesso.
Love,
Ulrika
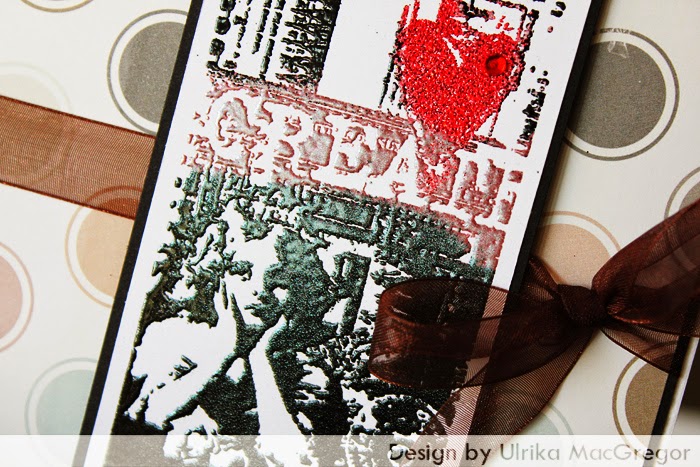
Har du provat att använda fler embossingpulver på samma motiv? Om inte - GÖR DET! Det är hur kul som helst, och spännande att se vad effekten blir beroende på vilka färger man väljer. Här har jag använt några av Reprint's collagestämplar, som gör sig väldigt bra med den här tekniken. Ett tips är att använda svart eller väldigt mörkt pulver till ansikten, annars kan det se lite konstigt ut.
Have you ever tried to use several different embossing powders on the same stamped image? If not - DO IT! It is seriously fun, and so exciting to see how the result turns out differently depending on the choice of embossing powder colours. For these cards, I used some of Reprint's collage stamps, which are perfect for this technique. A tip is to use black powder - or at least very dark - for any faces, otherwise they may turn out a little spooky.

Börja med att stämpla motivet med en Versa mark dyna, den är ofärgad och klibbig tillräckligt länge för att man ska hinna experimentera lite. Häll sedan lite pulver precis på det motiv du vill ska ha den färgen, och häll av pulvret på ett papper så att du kan återvinna det som blir över. Sen fortsätter du med nästa färg. Den nya färgen kommer bara att fastna där det fortfarande finns klistrig stämpelfärg, inte på de partier där du redan hällt på pulver. När hela motivet har embossingpulver och allt överflödigt pulver är avhällt så värmer du med en värmepistol till allt pulver smält.
Start by stamping using a Versa mark pad, which is clear and sticky long enough for you to play around with different embossing powders. Pour a little powder over part of the image, and then pour shake it off over a piece of paper so you can collect and re-use the excess. Move on to the next color of powder. The new colour will only adhere to the sticky areas, so the area you just covered will stay the same. Continue until all of the image is covered with embossing powders, and make sure you have removed the excess powder. Heat and melt the powder using a heat tool.
Med lite precision så kan man välja precis vilken del av stämpeln som ska ha vilken färg, här har hjärtat blivit rött, texten rosa, och övriga delar svarta.
By being careful, you can really work with precision and colour each area as you like. Here, the heart is red, the text is pink and the rest is black.
Love,
Ulrika
Idén till denna canvastavla är inte ny, men det är däremot materialet. Rispapper, washitape och underbara designpapper med jultema är alla nyinkomna i Reprints sortiment. Rispappret fästes direkt på canvasduken med ett särskilt rispapperslim och målades sedan över med en white-wash av gesso och vatten. Snöflingor och text stämplades med Staz-on och pappersremsorna som bildar själva granen fick först kanterna infärgade med Distress ink och fästes sedan med decoupagelim.
The idea for this canvas is not new, but the materials sure are! The rice paper, washi tape and the wonderful Christmas design papers are all new. The rice paper is adhered directly to the canvas base using a special glue for rice papers, and then covered with a white wash of gesso and water. I used Staz-on for the stamps to ensure that they would not smere for the next steps. I inked the edges of the paper strips for the tree with Distress ink, and then adhered them using decoupage glue.
Den stämplade texten klipptes i bitar som fästes med decoupagelim. Guldflakes ligger som snö på grenarna här och där.
The stamped sentiment was cut into pieces and adhered using decoupage glue. The amazing gold flakes are sitting on the branches as if they were snow.
Inte en stjärna i topp, men däremot en julröd blomma. Glitterpasta ger den lite extra julig känsla.
This tree didn't get a star at the top, but instead a Christmas red flower. I covered it with glitter paste for that sparkly feeling.
Love,
Ulrika


