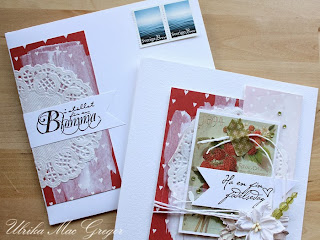
And here's yet another Birthday card, this one in soft pastels for that feeling of spring. The beautiful papers from Reprint's Basic Collection works all year around, here I gave them a thin coat of white gesso just to soften the colours a bit.
Lager på lager ger en arbetat känsla trots att det är så rackarns enkelt. Överst en stämplad grattishälsning på en urklippt banner, fäst med 3D-kuddar för lite extra djup.
Working with several layers gives the impression of a really well-worked card. I say impression, since it is really easy and hardly any effort at all! On the top I added a birthday wish cut out as a banner, adhered using foam adhesive squares for some dimension.
Ofta lägger vi ner tid och energi på att skapa själva korten. Men med enkla medel kan man skapa intresse och förväntningar redan på vägen från postlådan, genom att dekorera även kuvertet! Här har jag låtit samma tema gå igen på utsidan, med en kakservett och samma designpapper som jag använt på kortet.
We usually spend a lot of time and effort on making the actual card. But it is fairly easy to make also the envelope a bit more interesting. Here I used the same theme on the envelope as on the card, like using the same paper and a doily.
Även baksidan har fått lite omtanke. Dekorationen från framsidan fortsätter runt kanten, och ett par söta stämplar pryder sin plats. Detta kuvert är enkelt vikt med Ultimate Pro plattan från Crafter's Companion. Kuvertet försluts med dubbelhäftande tejp, och som extra dekoration använde jag en bit washitape också.
The back of the envelope also got some love. The decoration from the front wraps around the edge and continues on the back. A couple of stamps were added. This envelope was folded using the Ultimate Pro from Crafter's Companion (so easy!), and it's closed using double sided tape. I added a bit of washi tape just as decoration.

Ulrika


Inga kommentarer:
Skicka en kommentar